The Ultimate Guide to Plant Layering

The Gardener’s Guide to Layering: Multiply Your Plants for Free
Have you ever wanted to turn one prize-winning blueberry bush into five? Or perhaps you have a leggy indoor Fiddle Leaf Fig that needs a "reset"? While many gardeners reach for seed packets or cuttings, there is a safer, more reliable method used by pros: Layering.
In this guide, we’ll explore what layering is, the different techniques you can use, and how to avoid the common mistakes that lead to failure.
What is Layering?
Layering is a form of asexual propagation where a new plant is created by encouraging a stem or branch to grow roots while it is still attached to the parent plant.
Unlike cuttings—which are "severed" and must survive on stored energy until they root—a "layered" plant continues to receive water and nutrients from the mother plant's root system throughout the entire process. This makes it one of the most successful propagation methods for "difficult-to-root" species.
Why Gardeners Love Layering
- Low Risk: If the branch fails to root, it’s still attached to the parent, so you haven't lost anything.
- Larger Starters: You can often produce a 2-foot tall plant in a single season, whereas a cutting or seed would take years to reach that size.
- No Fancy Gear: You don't need a misting bench, humidity domes, or a greenhouse. The natural environment does the work.
5 Common Layering Techniques
1. Simple Layering
This is the "bend and bury" method. It works best for flexible, low-hanging shrubs.
- How to do it: Bend a flexible branch to the ground. Wound the underside of the stem where it touches the soil, apply rooting hormone (optional), and bury that section under 3-4 inches of soil.
- Best for: Forsythia, Azaleas, Boxwood, Lilacs, and Honeysuckle.
2. Tip Layering
Nature’s favorite way to spread. This happens when the tip of a plant grows into the soil and spontaneously roots.
- How to do it: In late summer, bury the tip of a current-season shoot 2 inches deep. It will grow downward, then curve back up.
- Best for: Blackberries, Raspberries, and Boysenberries.
3. Air Layering (Maricottage)
For plants with stiff stems that won't bend to the ground, we bring the soil to the branch.
- How to do it: Peel a small ring of bark off a branch (girdling). Wrap the wound in damp sphagnum moss and seal it with plastic wrap and foil to keep out light and keep in moisture.
- Best for: Rubber Trees (Ficus elastica), Monsteras, Roses, Camellias, and Citrus trees.
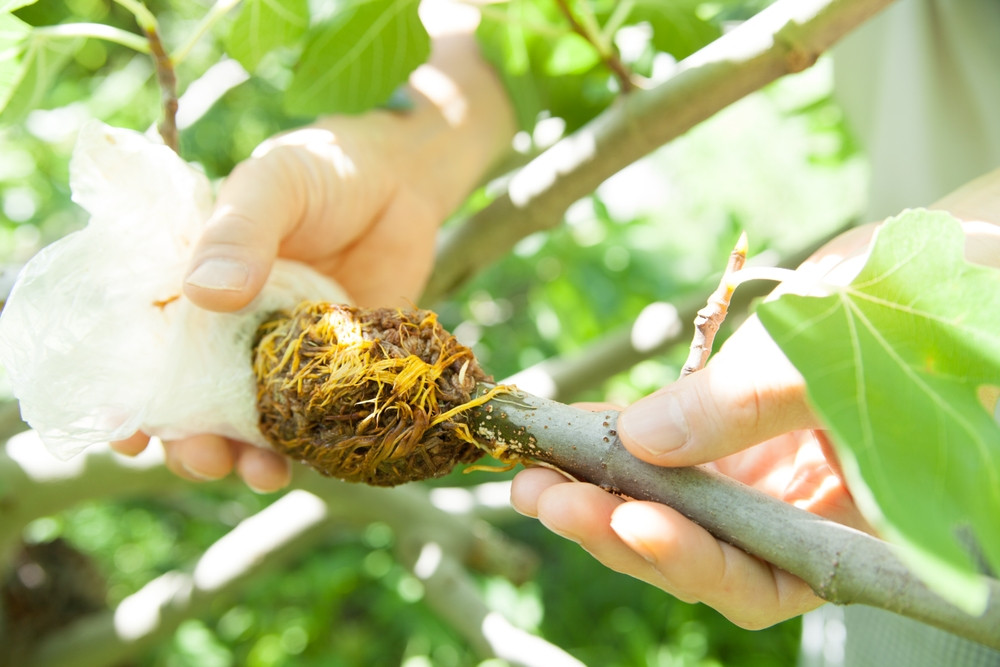
air layering a fig tree
4. Compound (Serpentine) Layering
Similar to simple layering, but used for long, vine-like stems.
- How to do it: Loop the stem in and out of the soil like a serpent, burying several nodes while leaving the nodes in between exposed. You can get multiple plants from one branch!
- Best for: Wisteria, Clematis, Grapes, and Heartleaf Philodendron.
5. Mound (Stooling) Layering
This is a "heavy-duty" method often used in commercial nurseries.
- How to do it: Cut the parent plant back to the ground in winter. When new shoots emerge in spring, mound soil or sawdust over the base of the shoots. Roots will grow into the mound.
- Best for: Apple rootstocks, Gooseberries, and Quince.
Pitfalls to Watch Out For
Even though layering is high-success, things can still go wrong. Watch out for these three "root-killers":
- Drying Out: Especially in Air Layering, if the moss dries out, the new roots will die instantly. Ensure your plastic wrap is airtight.
- Severing Too Early: It’s tempting to snip the new plant off early. Always "tug" gently or check for visible roots before disconnecting it from the parent.
- Wrong Time of Year: Most layering should be started in early spring (for dormant wood) or mid-summer (for active growth). Trying to layer in the middle of a freezing winter rarely works.
Summary: Layering vs. Cuttings
| Feature | Layering | Cuttings |
|---|---|---|
| Success Rate | Extremely High | Variable |
| Nutrient Source | Parent Plant | Stored Energy |
| Equipment | Minimal | High (Misters/Domes) |
| Time to Root | 3 - 12 Months | 2 - 8 Weeks |
Plan Your Propagation with VegPlotter
Ready to expand your berry patch? Use the VegPlotter Garden Planner to map out where your new "layered" plants will go next season. By planning ahead, you can ensure your garden has the space for its new, free inhabitants!
Follow VegPlotter for more expert gardening tips and propagation secrets.